In Embedded Linux systems, I²C (Inter-Integrated Circuit) is a widely used protocol for interfacing peripherals such as sensors, EEPROMs, ADCs, and displays. While kernel drivers offer full-featured access to the I²C bus, there are many situations — such as rapid prototyping, hardware testing, or even simple operations in a shipped product — where using userspace interfaces is simpler and more flexible.
Linux provides a standardized interface for accessing I²C buses directly from userspace, through device files exposed under /dev/. These interfaces allow developers to communicate with bus-attached devices using standard read()/write()/ioctl() calls, without the need to write kernel modules.
This article explores several ways to access I²C, including command line tools, and code examples.
It is assumed that the reader is familiar with the basic concepts of the I²C and SMBus. To understand why SMBus is relevant see section I²C vs SMBus.
Don’t forget to check out bonus material in the In Depth section.
Userspace access to I²C in Linux comes with important limitations. It cannot handle hardware interrupts, making low latency responsiveness impossible. Data transfers rely on the CPU, as userspace cannot use DMA, which limits performance for high-speed or large-volume communication. Timing is not deterministic due to Linux process scheduling, making precise control unreliable.
Additionally, userspace lacks bus arbitration, so concurrent access by multiple processes can cause conflicts. Security is also a concern, as device files usually require root access or specific permissions. These limitations make userspace suitable for testing and simple tasks, but not ideal for production-grade or performance-critical applications.
In this article, we will demonstrate how to work with hardware that features three I²C buses and two connected devices:
ADXL345 accelerometer located at address 0x53 on bus i2c-0
VL53L1X Time-of-Flight sensor located at address 0x29 on bus i2c-2
Note the final option could be expanded further for additional alternatives/OSes.
i2c-tools is a package with a set of commands for accessing I²C devices from userspace.
The package includes the following tools:
i2cdetect – Detects I²C buses and scans for connected devices
i2cdump – Display a device’s register content
i2cset – Write values to device registers
i2cget – Read values from device registers
i2ctransfer – Perform compound I²C transfers
i2c-tools can be installed on Debian distros with:
sudo apt install i2c-tools
For Embedded targets built by Yocto one can for example add to local.conf:
CORE_IMAGE_EXTRA_INSTALL += “i2c-tools”
i2cdetect serves three purposes: to detect available I²C interfaces, list their functionality, and list devices connected to a specific interface.
i2cdetect serves three purposes: to detect available I²C interfaces, list their functionality, and list devices connected to a specific interface.
					root@cyclone5:~# i2cdetect -l
i2c-0   i2c             Synopsys DesignWare I2C adapter         I2C adapter
i2c-1   i2c             Synopsys DesignWare I2C adapter         I2C adapter
i2c-2   i2c             ff290000.i2c                            I2C adapter
We can learn what functionality is supported by each of the available interfaces.
Listing interface functionality for interface i2c-0:
					root@cyclone5:~# i2cdetect -F 0
Functionalities implemented by /dev/i2c-0:
I2C                              yes
SMBus Quick Command              no
SMBus Send Byte                  yes
SMBus Receive Byte               yes
SMBus Write Byte                 yes
SMBus Read Byte                  yes
SMBus Write Word                 yes
SMBus Read Word                  yes
SMBus Process Call               no
SMBus Block Write                yes
SMBus Block Read                 yes
SMBus Block Process Call         no
SMBus PEC                        no
I2C Block Write                  yes
I2C Block Read                   yes
i2cdetect can also probe for devices available on the i2c-0 bus as shown below. This is considered to be a safe way to probe the bus. Only addresses marked with “–”, or where an address (53) is displayed, are probed.
					root@cyclone5:~# i2cdetect -y 0
Warning: Can't use SMBus Quick Write command, will skip some addresses
     0  1  2  3  4  5  6  7  8  9  a  b  c  d  e  f
00:
10:
20:
30: -- -- -- -- -- -- -- --
40:
50: -- -- -- 53 -- -- -- -- -- -- -- -- -- -- -- --
60:
70:
The warning “Can’t use SMBus Quick Write command, will skip some addresses” and the reason for not probing all addresses is explained in section Risks.
Now let’s have a look at another I²C bus (i2c-2). The gentle probing reveals no devices.
					root@cyclone5:~# i2cdetect -y 2
Warning: Can't use SMBus Quick Write command, will skip some addresses
     0  1  2  3  4  5  6  7  8  9  a  b  c  d  e  f
00:
10:
20:
30: -- -- -- -- -- -- -- --
40:
50: -- -- -- -- -- -- -- -- -- -- -- -- -- -- -- --
60:
70:
Maybe that is the case, but if we dare, we can poke a bit harder and see what pops up. We can ask i2cdetect to probe for all addresses. Just make sure you read the Risks section first.
Now we can see that all addresses were probed and indeed, there is a device hiding behind what is considered to be an unsafe address 0x29.
					root@cyclone5:~# i2cdetect -y -a -r 2
     0  1  2  3  4  5  6  7  8  9  a  b  c  d  e  f
00: -- -- -- -- -- -- -- -- -- -- -- -- -- -- -- --
10: -- -- -- -- -- -- -- -- -- -- -- -- -- -- -- --
20: -- -- -- -- -- -- -- -- -- 29 -- -- -- -- -- --
30: -- -- -- -- -- -- -- -- -- -- -- -- -- -- -- --
40: -- -- -- -- -- -- -- -- -- -- -- -- -- -- -- --
50: -- -- -- -- -- -- -- -- -- -- -- -- -- -- -- --
60: -- -- -- -- -- -- -- -- -- -- -- -- -- -- -- --
70: -- -- -- -- -- -- -- -- -- -- -- -- -- -- -- --
Back on the i2c-0 bus where we have detected a device at address 0x53. It happens to be the ADXL345 accelerometer. Unfortunately i2c-tools cannot tell us what kind of devices are present. For that you will have to consult the schematics, device tree or traverse sysfs (/sys).
The ADXL345 uses a standard register addressing scheme that is compatible with tools like i2cdump. It begins reading from register address 0x00 and continues sequentially up to 0xFF.
					root@cyclone5:~# i2cdump -y -f 0 0x53
No size specified (using byte-data access)
     0  1  2  3  4  5  6  7  8  9  a  b  c  d  e  f    0123456789abcdef
00: e5 00 00 00 00 00 00 00 00 00 00 00 00 00 00 4a    ?..............J
10: 82 00 30 00 00 01 fb 3c 00 00 00 8e 00 00 00 00    ?.0..??<...?....
20: 00 00 00 00 00 00 00 00 00 00 00 00 0a 08 00 00    ............??..
30: 83 00 06 00 ea ff f4 00 00 00 00 00 00 00 00 00    ?.?.?.?.........
40: e5 00 00 00 00 00 00 00 00 00 00 00 00 00 00 4a    ?..............J
50: 80 00 30 00 00 01 fa 3c 00 00 00 8e 00 00 00 00    ?.0..??<...?....
60: 00 00 00 00 00 00 00 00 00 00 00 00 0a 08 00 00    ............??..
70: 83 00 05 00 ec ff f4 00 00 00 00 00 00 00 00 00    ?.?.?.?.........
80: e5 00 00 00 00 00 00 00 00 00 00 00 00 00 00 4a    ?..............J
90: 82 00 30 00 00 01 fb 3d 00 00 00 8e 00 00 00 00    ?.0..??=...?....
a0: 00 00 00 00 00 00 00 00 00 00 00 00 0a 08 00 00    ............??..
b0: 83 00 04 00 ed ff f6 00 00 00 00 00 00 00 00 00    ?.?.?.?.........
c0: e5 00 00 00 00 00 00 00 00 00 00 00 00 00 00 4a    ?..............J
d0: 82 00 30 00 00 01 fb 3d 00 00 00 8e 00 00 00 00    ?.0..??=...?....
e0: 00 00 00 00 00 00 00 00 00 00 00 00 0a 08 00 00    ............??..
f0: 82 00 04 00 ed ff f3 00 00 00 00 00 00 00 00 00    ?.?.?.?.........
Not all I²C devices implement the full range of 256 registers. For example, the ADXL345 provides only 64 valid registers. However, i2cdump still displays all 256 addresses. This happens because the ADXL345 wraps around after address 0x3F (decimal 63) and continues reading from 0x00 again.
Other devices may behave differently—some might not acknowledge (NACK) read requests to undefined registers but return no data. In such cases, i2cdump will typically display XX to indicate unreadable or undefined registers.
i2ctransfer is a very powerful command. It can actually do the same as i2cdump, i2cset and i2cget commands. Additionally, it can work with devices which implement register maps larger than 256 registers, or even more complex protocols.
The VL53L1X device with address 0x29 on bus i2c-2 implements 16-bits register addressing. Therefore, the above mentioned commands are not usable with this device. Luckily, i2ctransfer provides just what we need.
The arguments to the command can look a bit intimidating at first glance, but it quickly becomes clear how they are organized.
In the below example we ask for writing two bytes at address 0x29: w2@0x29. The two bytes are 0x01 0x0f. Then we ask to read 1 byte: r1.
					root@cyclone5:~# i2ctransfer -y 2 w2@0x29 0x01 0x0f r1
0xea
What we just did, was reading register at index (address) 0x01 0x0f, which holds the value 0xEA.
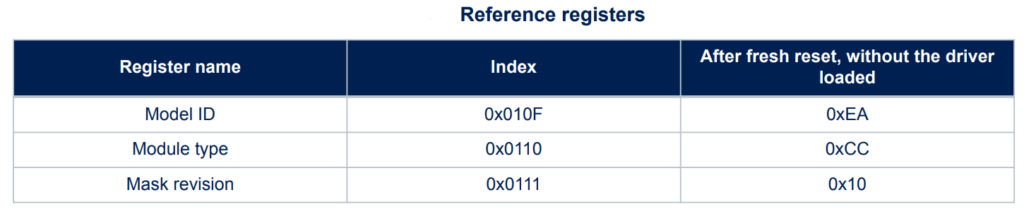
We can also read all the three consecutive registers simply by replacing r1 with r3.
					root@cyclone5:~# i2ctransfer -y 2 w2@0x29 0x01 0x0f r3
0xea 0xcc 0x10
Let’s have a look at a more complex case where multiple transactions are bundled. VL53L1X has a register that allows changing its I²C address. We can use i2ctransfer to both read and write in the same transfer.
Consider the following command:
					root@cyclone5:~# i2ctransfer -y 2 w2@0x29 0x00 0x01 r1 w3@0x29 0x00 0x01 0x39 w2@0x39 0x00 0x01 r1
0x29
0x39
w2@0x29 0x00 0x01 r1: reads 1 byte from register at address 0x00 0x01, which is 0x29
w3@0x29 0x00 0x01 0x39: writes 0x39 to the same register. 0x39 becomes the new I²C address of this devicew2@0x39 0x00 0x01 r1: reads 1 byte from the register at address 0x00 0x01 (note the new I²C address @0x39)
If you are not sure how i2ctransfer will interpret your request, you can skip the -y option (=say yes to all questions) to run in interactive mode. You will be presented with a list of transactions to be executed and you will also have the option to either continue or abort.
					root@cyclone5:~# i2ctransfer 2 w2@0x29 0x00 0x01 r1 w3@0x29 0x00 0x01 0x39 w2@0x39 0x00 0x01 r1
WARNING! This program can confuse your I2C bus, cause data loss and worse!
I will send the following messages to device file /dev/i2c-2:
msg 0: addr 0x29, write, len 2, buf 0x00 0x01
msg 1: addr 0x29, read, len 1
msg 2: addr 0x29, write, len 3, buf 0x00 0x01 0x39
msg 3: addr 0x39, write, len 2, buf 0x00 0x01
msg 4: addr 0x39, read, len 1
Continue? [y/N] y
0x29
0x39
This C program demonstrates how to communicate with an I²C device by opening the appropriate bus file (/dev/i2c-0), using an ioctl() call to select the device address (in this case, an ADXL345 accelerometer at 0x53), and performing register operations with simple write() and read() calls.
After waking the device by writing to its power‐control register, we set the internal register pointer to the data start address, read six bytes of raw X, Y, and Z axis data in one block and convert those little‐endian bytes into signed 16-bit integers. Finally, just print the accelerometer readings before closing the bus.
					#include <stdio.h>
#include <stdlib.h>
#include <stdint.h>
#include <fcntl.h>
#include <unistd.h>
#include <sys/ioctl.h>
#include <linux/i2c-dev.h>

#define I2C_DEVICE      "/dev/i2c-0"
#define I2C_ADDR        0x53    // Device address
#define REG_POWER_CTL   0x2D    // Power control register
#define REG_DATA_START  0x32    // Data register start

int main(void) {
    int file;
    uint8_t buf[2];
    uint8_t data[6];
    int16_t x, y, z;

    // Open I2C device
    if ((file = open(I2C_DEVICE, O_RDWR)) < 0) {
        perror("Failed to open the i2c bus");
        exit(EXIT_FAILURE);
    }

    // Specify the address of the I2C Device to communicate with
    if (ioctl(file, I2C_SLAVE, I2C_ADDR) < 0) {
        perror("Failed to acquire bus access and/or talk to device");
        close(file);
        exit(EXIT_FAILURE);
    }

    // Wake up the device: write 0x08 to POWER_CTL register
    buf[0] = REG_POWER_CTL;
    buf[1] = 0x08;
    if (write(file, buf, 2) != 2) {
        perror("Failed to write to the power control register");
        close(file);
        exit(EXIT_FAILURE);
    }

    printf("Reading 6 bytes from register 0x%02X...\n", REG_DATA_START);
    // Set register pointer to data start
    buf[0] = REG_DATA_START;
    if (write(file, buf, 1) != 1) {
        perror("Failed to set data register pointer");
        break;
    }

    // Read 6 bytes of data (X, Y, Z)
    if (read(file, data, 6) != 6) {
        perror("Failed to read data from device");
        break;
    }

    // Convert little-endian bytes to signed 16-bit values
    x = (int16_t)((data[1] << 8) | data[0]);
    y = (int16_t)((data[3] << 8) | data[2]);
    z = (int16_t)((data[5] << 8) | data[4]);
    // Print the raw values
    printf("X: %6d, Y: %6d, Z: %6d\n", x, y, z);
    close(file);
    return 0;
}
This Python script does basically the same as the above C program.
Note that we are using the smbus2 module. There isn’t a built-in “I²C” module in Python—what you usually see is the SMBus interface (provided by packages like smbus or smbus2). When you write from smbus2 import SMBus you’re using the SMBus API to talk to the I²C bus under the hood. In other words, smbus2 wraps the same ioctl calls that you’d otherwise would have to issue yourself if you opened /dev/i2c-* directly. If you need lower-level control, you could open the I²C device node and issue ioctl calls manually, but in most cases using SMBus from smbus2 is the simplest way to work with in Python.
					#!/usr/bin/env python3
import time
from smbus2 import SMBus

I2C_BUS       = 0       # corresponds to /dev/i2c-0
DEVICE_ADDR   = 0x53    # 7-bit I²C address
REG_POWER_CTL = 0x2D
REG_DATA_START= 0x32

def twos_complement(val):
    """Convert unsigned 16-bit to signed (-32768 to 32767)."""
    if val & (1 << 15):
        return val - (1 << 16)
    return val

def main():
    with SMBus(I2C_BUS) as bus:
        # Wake up device
        bus.write_byte_data(DEVICE_ADDR, REG_POWER_CTL, 0x08)
        print(f"Device 0x{DEVICE_ADDR:02X} powered on. Reading data...")

        # Read 6 bytes starting at REG_DATA_START
        raw = bus.read_i2c_block_data(DEVICE_ADDR, REG_DATA_START, 6)
        # raw = [b0, b1, b2, b3, b4, b5]

        x = twos_complement(raw[0] | (raw[1] << 8))
        y = twos_complement(raw[2] | (raw[3] << 8))
        z = twos_complement(raw[4] | (raw[5] << 8))

        print(f"X:{x:6d}, Y:{y:6d}, Z:{z:6d}")

if __name__ == "__main__":
    try:
        main()
    except PermissionError:
        print("Permission denied: you may need to run as root (sudo) or adjust /dev/i2c-0 permissions.")
    except Exception as e:
        print("Error:", e)
You should have noticed multiple references to SMBus, especially with command i2cdetect -F 0.
i2cdetect uses SMBus commands because SMBus is a strict subset of I²C. Many I²C interface drivers in the kernel only implement SMBus-level operations, so using these ensures broader compatibility and safer probing of devices. This design allows i2cdetect to work reliably across both I²C and SMBus-compliant hardware.
Also, the the SMBus commands “Write Byte” and “Read Byte” are directly compatible with the I²C data transfer commands “Single-Byte Write” and “Single-Byte Read”.
Use of i2c-tools does not come without risks.
Warnings like “Warning: Can’t use SMBus Quick Write command, will skip some addresses“ or “WARNING! This program can confuse your I2C bus, cause data loss and worse!” are displayed during execution.
The documentation for i2cdetect warns about additional risks:
					-q
  Use SMBus "quick write" commands for probing
  (by default, the command used is the one believed to be the safest for each address).
  Not recommended.
  This is known to corrupt the Atmel AT24RF08 EEPROM found on many IBM Thinkpad laptops.
-r
  Use SMBus "read byte" commands for probing
  (by default, the command used is the one believed to be the safest for each address).
  Not recommended.
  This is known to lock SMBus on various write-only chips (most notably clock chips at address 0x69).
Another risk involves accessing devices that are managed by kernel device drivers. If a driver is performing a sequence of non-atomic transactions—such as read/modify/write of a register—interleaving user-space access (such as with i2cdump or i2cset) can disrupt this communication. This can lead to unpredictable or undesired behavior, including data corruption or device malfunction.
Whether you’re debugging a new board or writing quick scripts to configure sensors, userspace access to I²C can be an incredibly powerful and time-saving tool.
The i2c-tools suite offers command-line utilities for probing devices and performing basic read/write operations, making it ideal for quick diagnostics and scripting. For more advanced use cases, robust I²C libraries are available for both C and Python, allowing seamless integration into your applications.
However, be cautious: userspace access to I²C comes with risks. Improper use can lead to communication issues—or in worst cases—bricked devices.
With a background in Embedded Systems development, Michal has worked on projects ranging from bare-metal applications to Embedded Linux platforms. In his role as a Principal Software Developer and System Architect, he has taken on responsibility for delivering robust technical solutions in cross-disciplinary teams. He is particularly focused on systems engineering and requirements handling, and is known for a detail-oriented and proactive approach to development.

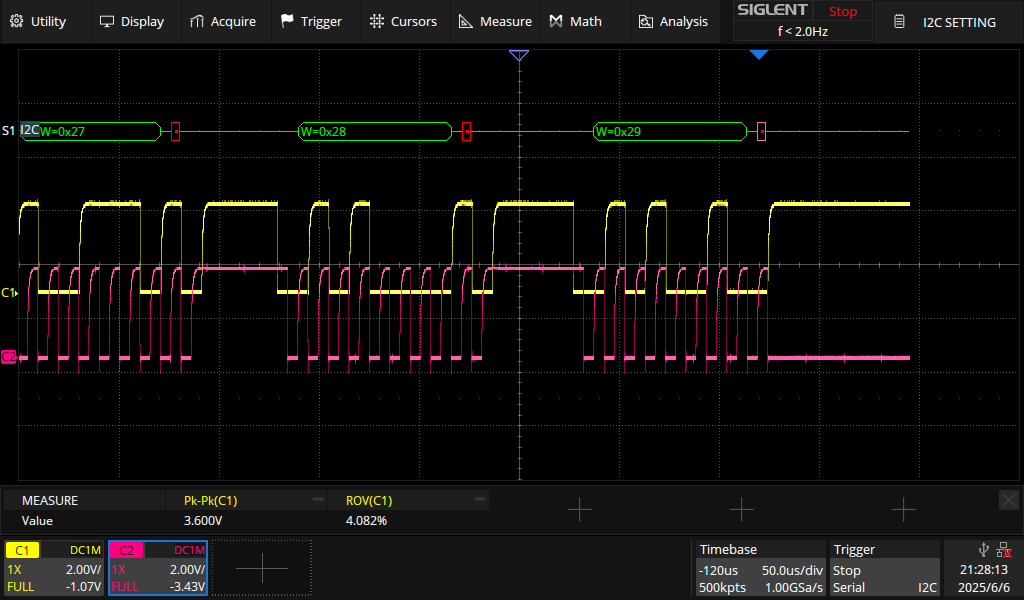
When a I²C reports that it supports SMBus Quick Write command,
					root@cyclone5:~# i2cdetect -F 2
Functionalities implemented by /dev/i2c-2:
I2C                              yes
SMBus Quick Command              yes
then i2cdetect will probe the devices with command of the format:
[S] [ADDR|WRITE] [NACK/ACK] [P].
The below screenshot shows probing of a devices with addresses 0x27,ox28 and 0x29 with a Quick Write command. Only device with address 0x29 exists.
Recall the warning:
					root@cyclone5:~# i2cdetect -y 0
Warning: Can't use SMBus Quick Write command, will skip some addresses
The warning tells us that our driver and/or I²C controller doesn’t support SMBus Quick Write
This is also confirmed by the below command:
					root@cyclone5:~# i2cdetect -F 0
Functionalities implemented by /dev/i2c-0:
I2C                              yes
SMBus Quick Command              no
In this case, i2cdetect probes by sending a Read Byte Command of the following format:
[S] [Addr Rd/Wr] [A] [P] [S] [CMD] [A] [P].

Note that when probing an address and no device responds, the driver still sends the command byte even when the address is not acknowledged (NACK). This happens because the driver’s implementation groups the address and command into a single transfer and doesn’t have the granularity to stop right after the NACK.