Introduction
Ever wondered how Wi-Fi really works? There’s a cool feature called “monitor mode” which enables you to peek behind the scenes of Wi-Fi networks. Think of it like having superpowers for your Wi-Fi adapter.
In this article, I will explain what “monitor mode” is, and show you how it can be your secret weapon for a better understanding of Wi-Fi. Whether you’re a tech guru or just curious about how your things connect wirelessly, we’re about to dive into a world where we uncover hidden signals in the air.
Monitor mode enables a computer equipped with a wireless network adapter to observe all Wi-Fi traffic flowing within range. In contrast to promiscuous mode, which serves a similar purpose for packet sniffing, monitor mode permits the capture of packets without the necessity of establishing a connection with an access point beforehand.
This guide will provide you with basic theory as well as a tutorial on how to get started with Wi-Fi monitoring.
Normal, Promiscuous and Monitor mode
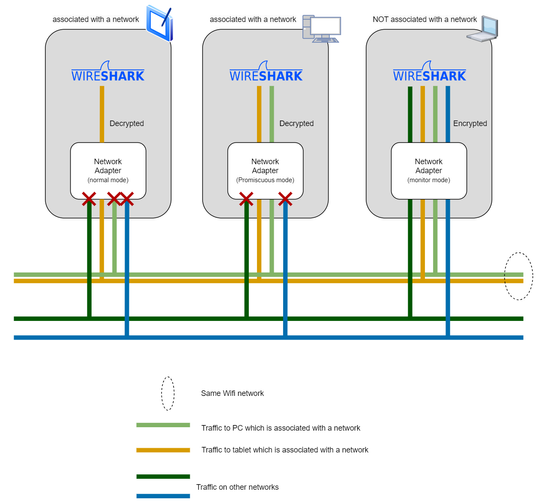
In the default Normal mode, a Wi-Fi adapter selectively allows broadcast packets and packets specifically addressed to your device to pass through its filter at the lower network layers. However, to capture a broader range of packets beyond those directed at your device, it’s necessary to configure the Wi-Fi adapter into either Promiscuous or Monitor mode, depending on the intended purpose. Notably, Monitor mode not only facilitates the capture of packets but also extends the capability to capture 802.11 management and low-level control packets.
IEEE 802.11 refers to the set of standards that define communication for wireless LANs (wireless local area networks, or WLANs), commonly known as Wi-Fi.
When sniffing packets in Promiscuous mode, establishing an association with an access point is requisite. This configuration grants Wireshark visibility into all packets traversing the network, albeit limited to a single channel at any given time.
To draw an analogy, envision joining a group conversation where, despite not being the intended recipient, you can overhear someone saying, “Hey, Mike, I have a new Wi-Fi adapter.” Similar to this scenario, in Promiscuous mode, you gain access to all network communications, though limited to one channel.
On the other hand, Monitor mode allows packet sniffing without the necessity of associating with any access point. In this mode, encrypted packets remain encrypted by the adapter or the driver; however, they are still presented to Wireshark for analysis.
To illustrate, picture yourself strolling down a street, casually listening to people conversing in foreign languages. In this analogy, the foreign languages represent encrypted packets, and your ability to understand them symbolizes Monitor mode’s capacity to capture packets without establishing an association with an access point.
Entering Monitor mode
Once you have setup your environment as described in the Appendix, or in other ways suitable for your system, you are ready to do Wi-Fi sniffing.
To enable monitor mode simply execute:
sudo airmon-ng start wlan0
replace wlan0 with the interface on your system.
Capturing packets with Wireshark
Start Wireshark as super user and select wlan0. You should now see some packets being captured. You will most likely see packets received from only a single channel, in my case it’s channel 10.
Some of the packets are show below. Most of them belong to the IEEE 802.11 layer.
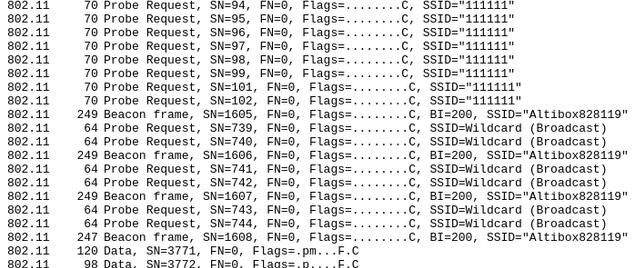
Probe Request: A device requests to join a network with a given SSID
Probe Response: An Access Point responds to a request
Beacon frame: An Access Point advertises its existence
Data: These are encrypted packets on one of the networks Wireshark can’t decode without knowing the network passwords. These are shown as 802.11, because Wireshark can only decode the 802.11 header.
If you are interested in a different channel you can switch by executing:
iw dev wlan0 set channel <channel>
Wi-Fi connection sequence
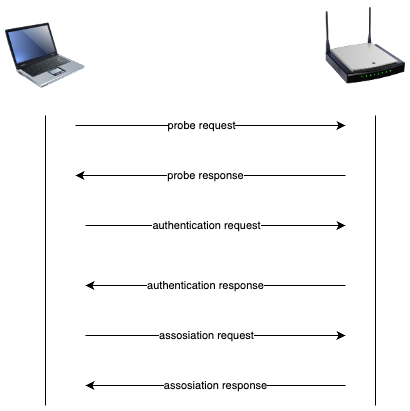
The Wi-Fi connection sequence involves a series of steps for a device to join a wireless network. First, the device scans for available networks and sends out probe requests. Upon finding a suitable network, it initiates a connection request. The access point then responds, and both devices negotiate security parameters before the device is authenticated and associated with the network, thus completing the connection sequence.
The sequence is shown below together with the actual packets captured from a real connection.

Decrypting packets
Now the most interesting part, namely decrypting packets without associating your device with a network.
This is described in details in this tutorial HowToDecrypt802.11.
It’s important to note that this method won’t extend to decrypting packets that undergo additional encryption at the application layer, such as those associated with SSH traffic.
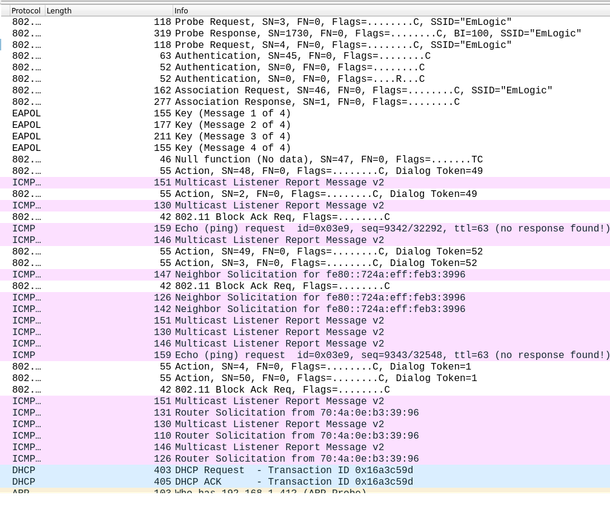
To illustrate the significance of this decryption capability, consider the network association process for a device, encompassing activities like DHCP requests. Without undergoing the tutorial on decrypting 802.11, protocols other than 802.11 and EAPOL (Extensible Authentication Protocol over LAN) might remain concealed. This means that certain network activities and communication layers would be obscured, hindering a comprehensive understanding of the network dynamics.
It is important to note that monitor mode must be enabled, and Wireshark must start capturing packets before said device tries to connect. This is because Wireshark needs to capture the EAPOL messages, which are used to exchange Cryptographic Keying information, to be able to decrypt non 802.11 packets. Once the keys are known, protocols like ICMP, DHCP and many more are decrypted.
Conclusion
Activating Monitor mode on a Wi-Fi adapter offers a robust means of sniffing Wi-Fi traffic. This extends beyond the network your host is directly associated with, encompassing all airborne traffic. If knowledge of passwords for one or more networks is available, it becomes feasible to monitor the traffic as if the host was associated with those networks. As illustrated, this inclusive sniffing capability spans all layers, including the intricate 802.11 layer. The amalgamation of these features paints a comprehensive picture of all network activity, thereby establishing an invaluable framework for development and debugging purposes.
Appendix – System setup
The following is a tutorial on how to setup your system in order to utilize the monitor mode for Wi-Fi packet sniffing. Note that the procedure might be different in you case, especially if you run Linux natively.
The operating system
To begin, it’s essential to note that my host operating system is Windows 11, complemented by the WSL2 serving as the Linux runtime environment. This shows to be highly flexible, allowing me to seamlessly operate both systems concurrently.
It’s interesting to reflect on the journey, considering that, two decades ago, the idea of Microsoft shipping a Linux environment would have seemed inconceivable.
The Wi-Fi adapter
I encountered numerous challenges while attempting to configure my laptop Wi-Fi adapter for both monitor and promiscuous modes, both for Windows and WSL (Ubuntu). After grappling with the settings for some time, I opted to acquire an external Wi-Fi adapter more suited to the task. My choice fell upon the TP-Link Archer T9UH, equipped with the RTL8814AU chipset. This particular chipset has garnered positive recommendations from fellow Wi-Fi sniffing enthusiasts, making it a readily available and cost-effective option.
Despite the promising chipset, I soon found myself facing new set of challenges.
The driver
Given the notorious intricacies of working with Windows at the under-the-hood level, I opted to bypass potential challenges and focus directly on WSL. However, every chipset requires a suitable driver, and therein lay the challenge. Unfortunately, the kernel released by Microsoft for WSL2 did not include a driver compatible with my chosen TP-Link Archer T9UH, marking an unexpected hurdle.
Undeterred, I embarked on a quest to find a compatible driver. This quest led me through multiple alternatives, some of which had been superseded, while others languished in a state of disrepair due to lack of maintenance. After a persistent search, I eventually stumbled upon a driver that seemed reasonably up-to-date, prompting me to take the plunge and give it a try. https://github.com/morrownr/8814au
Git SHA f058ea8af3afd2a06b2a0a8bf8e2129bcb07d5f5
The kernel
The stock kernel for WSL2 at the time of writing is version linux-msft-wsl-5.15.133.1. The driver wouldn’t build as it is showed to be incompatible with that kernel. The driver required a kernel version 6. I’ve landed on Git tag linux-msft-wsl-6.1.21.2.
You can find the kernel build instructions here: https://learn.microsoft.com/en-us/community/content/wsl-user-msft-kernel-v6.
The software
You will also need some software to enable the monitor mode as well as do the packet decoding. As the title suggest, Wireshark is used for packet decoding. When it comes to enabling of the monitor mode this should be possible to do with some fancy commands, but I’ve used airmon-ng, which is part of the aircrack-ng package installed by sudo apt install aircrack-ng.
The Linux distribution
Despite the work I’ve done as described above I still struggled to get everything to work. There were some incompatibilities between some of the software components. Finally I’ve got that resolved by installing Kali Linux from the Microsoft Store and booting it with my kernel and driver build. Finally it all played together.
The WSL USB framework
By default, WSL2 doesn’t see any USB devices connected to the host (same as for VirtualBox). A USB device needs to be attached to WSL2. You can find easy to follow instructions here: https://github.com/dorssel/usbipd-win.
Give your Wi-Fi adapter a test ride
Once your Wi-Fi adapter is accessible from WSL2 you can load the 8814au driver:
sudo modprobe 8814au
#verify that driver was loaded
lsmod
Bring up wlan0:
sudo ifconfig wlan0 up
#verify that wlan0 is up
ifconfig
To further test the Wi-Fi adapter you could now connect to your local network with wpa_supplicant. Create a wpa_supplicant.conf file and populate it with the following:
ctrl_interface=/run/wpa_supplicant
update_config=1

network = {
        ssid="<you SSID>"
        psk="<your password>"
}
Start the wpa_supplicant and check if it connects:
sudo wpa_supplicant -c wpa_supplicant.conf -iwlan0Stop the wpa_supplicant with Ctrl-c
You are now setup for Wi-Fi traffic sniffing.