/dev/mem is a Linux device file that acts as a window to the entire physical address space, meaning a user program can read and write any address, RAM or I/O. /dev/mem can be memory-mapped by programs written in C, Python, or Rust. You can access a single address at a time or read/write large blocks of data. Note that for /dev/mem to be available, it must be enabled in the kernel configuration. You must also run as root (or via sudo) to access /dev/mem.
devmem is a tiny but powerful userspace utility. It uses /dev/mem to provide a simple command-line interface for address access. It’s beloved by many Embedded software developers and FPGA designers. Example usage:
					# read address 0x12345678
devmem 0x12345678
0xDEADBEEF
# write 0xDEADC0DE to address 0x12345678
devmem 0x12345678 w 0xDEADC0DE
# read back
devmem 0x12345678
0xDEADC0DE
The simplicity of /dev/mem and, and lack of restraints tempt many developers to use it not only during development but also in production code. After all, what harm can setting a few flags in a register do? Reading should be safe, right? Well, not really, there are pitfalls.
There are addresses that, under certain conditions, will hang the whole system when accessed. Common root causes include AXI transactions that never complete (unresponsive slaves, powered-down or unclocked peripherals, unimplemented registers, or stuck interconnect transactions). Reading or writing such addresses can block the interconnect, which looks exactly like a system hang.
Reading an address seems harmless, after all, you’re only looking at its value. While this is usually safe for memories, registers can have trigger-on-read or clear-on-read behavior. Custom memory-mapped FPGA registers can react in countless ways to an innocent read.
devmem bypasses kernel and process isolation. Direct memory access from the command line can leak information held by a process or by the kernel.
Address maps differ across CPUs and SoCs. Using devmem with hard-coded addresses is a pain to maintain when porting to new hardware.
Accessing registers or memory locations that are controlled by drivers can conflict with the drivers’ logic, causing unpredictable behavior.
Consider writing a driver that encapsulates both memory access and control logic. A device-tree entry should specify the memory range the driver is allowed to access.
For many devices, a full kernel driver is unnecessary. Often, all that’s required is memory access and maybe simple interrupt handling, while control logic can run in userspace. The UIO framework uses a small kernel module with most driver code in userspace, simplifying development and reducing kernel risk.
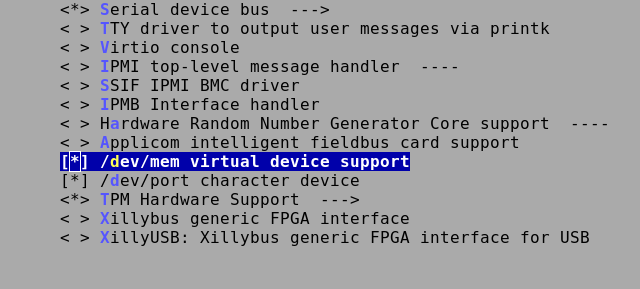
UIO must be enabled in the kernel. Check the relevant options in menuconfig and rebuild.
Next, you may need to add parameters to the kernel boot arguments. One way is via the device tree. Locate the bootargs setting and add uio_pdrv_genirq.of_id=generic-uio, for example:
bootargs = "earlycon console=ttyPS0,115200 root=/dev/mmcblk1p2 ro rootwait clk_ignore_unused uio_pdrv_genirq.of_id=generic-uio";
Now that UIO is enabled, define the memory or I/O range you want to access from userspace. In the example below (for a Zynq UltraScale+ SoC), the region named uio_mydev starts at address 0xa0000000 and has size 0x00010000.
					axi {
    uio_mydev@a0000000 {
        compatible = "generic-uio";
        /* 64-bit address: hi32 lo32 — size also hi32 lo32 */
        reg = <0x00000000 0xa0000000  0x00000000 0x00010000>; /* addr=0xa0000000 size=0x10000 */
        status = "okay";
    };
};
Boot your new kernel with the new device tree. You should find at least one /dev/uio* device file. For example:
					ls /dev/uio*
/dev/uio0  /dev/uio1  /dev/uio2  /dev/uio3  /dev/uio4
To identify which one corresponds to uio_mydev, use the sysfs attributes:
					cat /sys/class/uio/uio*/name
uio_mydev
axi-pmon
axi-pmon
axi-pmon
axi-pmon
From the above, /dev/uio0 is uio_mydev (it’s listed first). To confirm, check its address and size, they should match the device-tree settings:
					cat /sys/class/uio/uio0/maps/map0/addr
0x00000000a0000000
cat /sys/class/uio/uio0/maps/map0/size
0x0000000000010000
With everything set up, you can access the address space defined in the device tree. Each /dev/uio* is like a mini /dev/mem, exposing only a specific range. Offset 0 in the file maps to the base address specified in the device tree. For example:
A fragment of code needed for mapping is shown below:
					int fd = open("/dev/uio0", O_RDWR);
void *base = mmap(NULL, size, PROT_READ | PROT_WRITE, MAP_SHARED, fd, 0);
What about devmem? Can it access /dev/uio*? As mentioned, using devmem in production code is discouraged. If you still insist, you could modify devmem to operate only on your /dev/uio*. For example, change the line that opens /dev/mem to open your /dev/uioX (here: devmem.c if your system is using Busybox, otherwise devmem2.c), or add a command-line argument to select the device file at runtime.
To remove the temptation, disable /dev/mem in production by setting CONFIG_DEVMEM=n or in config menu for the kernel.
/dev/mem and devmem are great for bring up, lab debugging, and quick one off checks, but they are not recommended for production. They can hang the system, bypass kernel isolation, collide with drivers, and lock you to hardcoded addresses that do not port well to new hardware.
With a background in Embedded Systems development, Michal has worked on projects ranging from bare-metal applications to Embedded Linux platforms. In his role as a Principal Software Developer and System Architect, he has taken on responsibility for delivering robust technical solutions in cross-disciplinary teams. He is particularly focused on systems engineering and requirements handling, and is known for a detail-oriented and proactive approach to development.